May 12, 2021
Zoom has been widely used for online courses and meetings. Its new function “Immersive View” is now available (as of the end of April 2021). It is enabled by default for all accounts using Zoom 5.6.3 or higher.
It displays participants in a virtual space that appears like a classroom or a meeting room, thereby enabling them to immerse themselves in the situation.
As for myself, I did feel like getting involved in a class or a meeting more than when I used the usual displays (i.e., Gallery View and Speaker View). I also think that it strengthened a sense of unity among the participants. Why not add this new feature to your daily use of Zoom?
The instructor and students remain facing the same direction, so you may feel awkward if you imagine the face-to-face positions between the instructor and students in a real classroom.
In this regard, the following measures might help:
[How to set up “Immersive View” on Zoom]
Here is the PDF version: How to set up “Immersive View” on Zoom (*In Japanese) (Please click the following link for the general description of Zoom: Zoom | utelecon )
1. Update Zoom.
Click the upper right corner of the screen of the Zoom app (click your icon on the right of the search bar), and a bar will appear like the following figure. Click “Check for Updates” and update the app as necessary.
2. Click “My Profile.”
The following page will appear on your web browser.
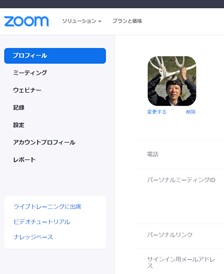
3. Click “Settings.”
Click “Settings” which is shown fourth down from “My Profile.”
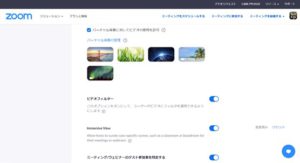
4. Scroll down the screen and turn on “Immersive View”
5. Start a meeting, click “View” in the upper right corner, and choose “Immersive.”
(Host) Click “Immersive,” and a window titled “Choose Immersive View” will appear. Choose the scene with an appropriate capacity (e.g., 5, 6, 25, etc.) and click “Start.” (This “View” setting does not appear on the screens of other participants.)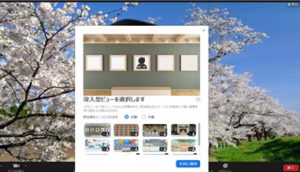
The following is the enlarged figure of the screen above. It shows scene options.

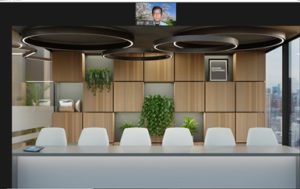
6. A scene example: “Art Gallery” (capacity: 5)
Click “Change Immersive View” on the upper right, and you can choose another scene. 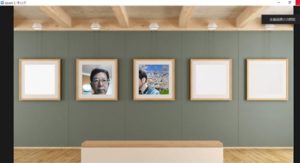
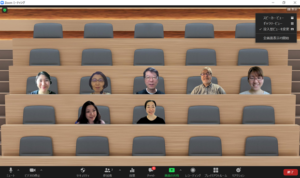
The following example shows a scene with a capacity of 24 people (i.e., four people per table).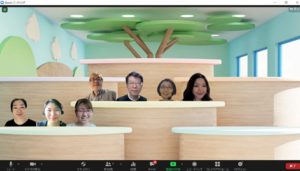
Here is a scene with a capacity of 25 people.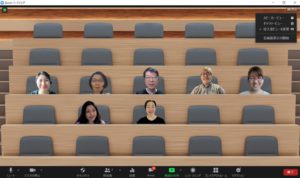
7. Tips on setting up Immersive View
(1) Set up “Immersive View” once all the participants are ready, otherwise, latecomers cannot join the scene and will be displayed in a small size outside the scene instead. In that case, reset the background (i.e., switch to Gallery Views or others), and try again.
(2) Note that the host will automatically be displayed in the center (or lower area; it depends on the scene you choose) of the scene.
The host can change the position of each participant by dragging and dropping.
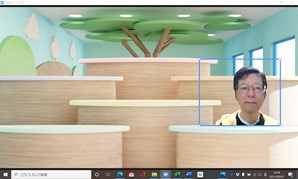
(3) The size of each participant varies depending on their distance from their PCs.
Click the area around the image, and you can change its size by expanding/contracting selection. (Some scenes do not allow size editing such as the scene with a capacity of five.)
You can change the position of your image by dragging and dropping it. Manipulate the blue-lined selection to change its size.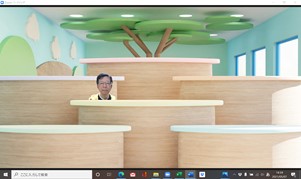
(4) You can customize the scene by uploading another image from your PC.
Click “+” icon (“add a custom background”) shown in the center right of the screen, and upload an image.
*A flashy photo may make the scene a bit annoying, so be careful!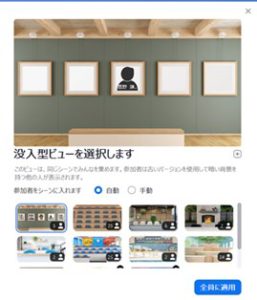
(5) Note that using your uploaded image (as described in (4)) may lower the whole picture quality of the scene.
Using uploaded images for a background is advantageous in automatically splitting the screen equally in accordance with the number of participants. (The default settings offer the following options for capacity: 2, 4, 5, 6, 24, and 25.)
If you cannot find “View” in the upper right, it may be because it is behind another participant’s image. In that case, try contracting the size of the image.
(6) As described at the beginning, it seems that all the participants should update Zoom to the latest version before starting a meeting to use Immersive View.
(The display goes black if his/her Zoom is not updated.)
(7) If the number of participants is more than the capacity of each scene, those who exceed the limit will be displayed as thumbnails in the upper area.
(8) Click the area around the image of a participant, and a blue-lined frame will appear. Click on the mark “x” in the upper right of the frame, and the participant will be displayed in the upper area in a thumbnail.
You can move the position of an instructor (or anyone) with this function.

The following shows how the image of a participant will be moved by clicking “x.”